To include Shopify tax in your e-commerce store checkout, you need to enable “Shopify tax” in your store’s admin setting, set up your tax rates, and specify tax codes for products with unique tax requirements. Keep reading to learn how each step works in detail.
What is Shopify Tax?
Shopify Tax is a feature within the Shopify platform designed to help merchants calculate and manage their sales taxes. It automatically calculates the appropriate tax rates to charge on products based on the buyer’s location, the seller’s location, and the type of product being sold.
Sales tax is an inescapable regulation for North American and UK e-commerce businesses. Tax laws in these countries require you to add taxes to the total at the checkout and file them correctly with your local authorities. One wrong move, and you could land a hefty fine.
It gets more complicated if your e-commerce business operates globally. In addition to filing taxes with your local authority, you’ll need to send reports to the regional authorities of your buyers.
Each country or state also has its own sales tax rates. You’ll need to charge the relevant amount to each customer, and the rate varies according to the products you sell. For example, if you’re selling to the UK, you will need to charge a 5% rate of VAT on car seats. But if you sell alcohol, you should charge a 20% rate. If you’ve got customers in California, on the other hand, you must charge a 6% sales tax.
While managing global tax compliance can be a headache, e-commerce tools like Shopify Tax make the process seamless.
Why Add E-Commerce Sales Tax to Your Shopify Store Checkout?
Adding e-commerce sales tax to your Shopify store checkout:
- Ensures compliance with local and international tax laws. E-commerce services and businesses are required to collect sales tax from customers in certain jurisdictions, such as the U.S. By automatically calculating and adding the correct sales tax, you minimize the risk of legal issues and potential fines.
- provides a transparent shopping experience for your customers. It allows them to see the total cost, including taxes, before making a purchase, which can help reduce cart abandonment rates caused by unexpected costs during the final stages of the buying process.
- Saves you significant time and effort, especially when dealing with sales across different regions with varying tax rates. The automation features available through Shopify Tax alleviate the burden of manually calculating taxes for each sale, allowing you to focus more on growing your business.
- Accurately charging and remitting taxes builds trust with your customers. This demonstrates your business’s integrity and reliability, which can encourage repeat purchases and enhance your brand’s reputation.
How to Add Sales Tax to Shopify Checkout
Follow these six easy steps to set Shopify taxes on checkout:
1. Access the Shopify Admin Panel and Select Tax Settings
You need to tell Shopify how much tax to charge to customers. To do so, you should head to your Shopify admin panel and choose Settings > Taxes and Duties.
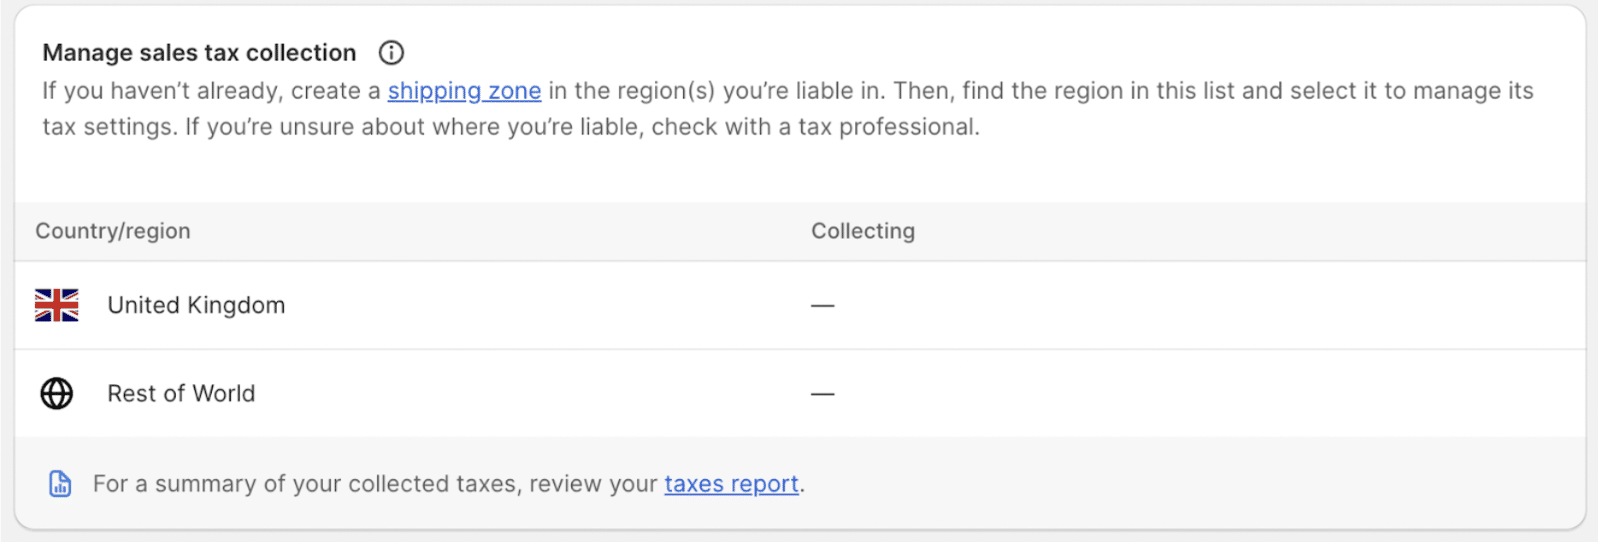
You should now see a list of all the countries that you charge sales tax to. The default setting will already list your home country. If you’re planning on selling in additional markets, you’ll need to create a shipping zone and read Shopify’s guide on how to do this.
Once you’ve set up shipping zones, you can start managing tax collection for the countries you operate in. Shopify taxes can be set up for the following regions:
- United States
- Canada
- United Kingdom
- EU member states
From the start, your location will appear in the ‘Manage taxes’ section. You can select your country and apply relevant sales tax. Shopify will even give insights into the correct amount of sales tax to charge for your region.
Note: By law, every customer should receive an invoice or receipt after checkout. You can do this with Shopify’s basic invoice setting, or you can invest in invoice billing software for a more comprehensive solution.
You may also need to follow a few steps specific to your region. For instance, US businesses have to include their state name and Tax ID, whereas UK businesses must enter a VAT number.
2. Activate Tax Calculations and Specify the Correct Region or Location
Once regional data has been added, it’s time to set up tax calculations for products in your store.
Scroll down on the ‘Taxes and duties’ page until you see an option labeled ‘Decide how tax is charged.’
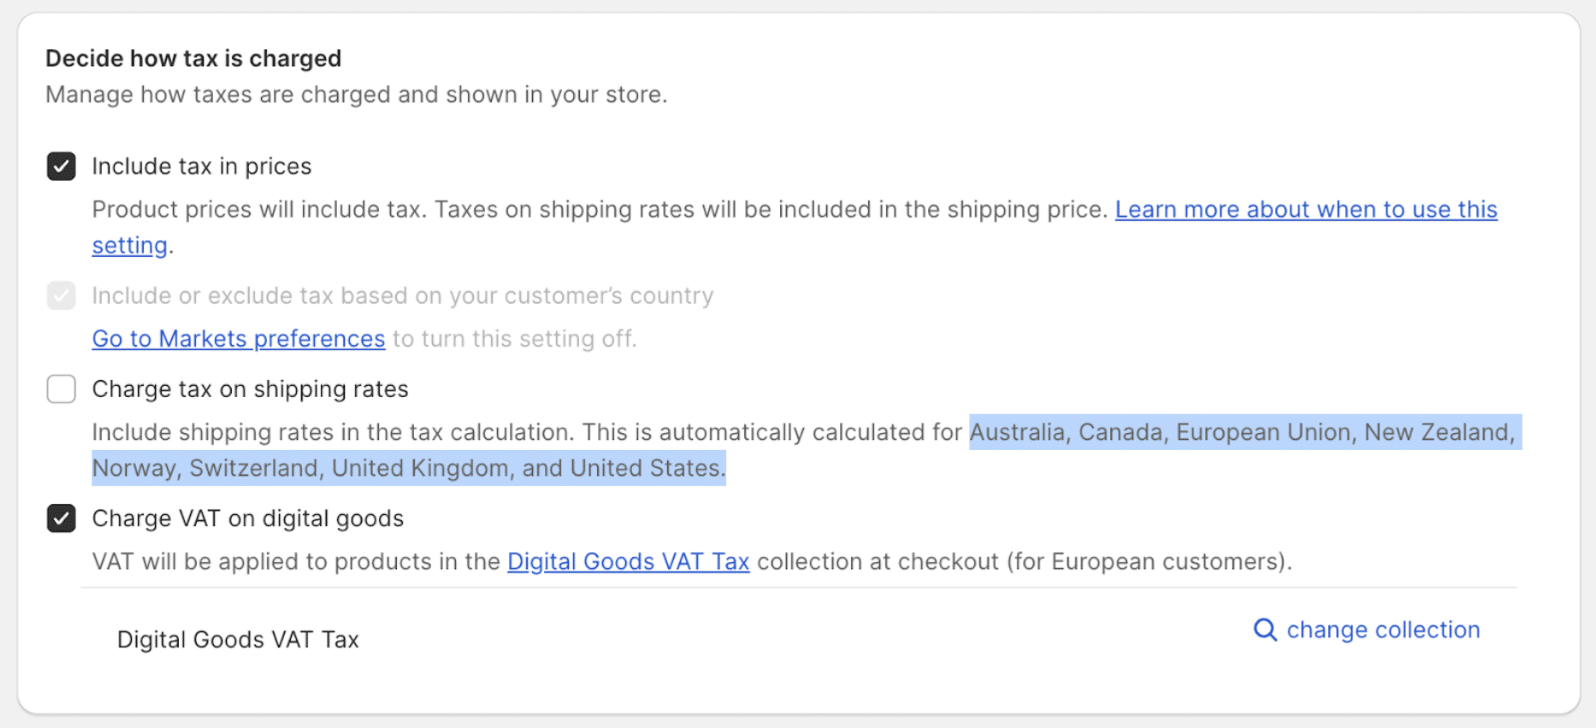
If you’re weighing up Woo Express vs Shopify, the number of tax calculation options may give Shopify the edge. Shopify offers ways to handle taxes on your store, including:
- Include tax in prices: When a customer looks at products on your site, they’ll see the overall price.
- Include or exclude tax based on your customer’s country: Alter how you present tax to shoppers from different countries. For example, EU customers might see tax included in the overall price, whereas US customers may see tax included at the checkout.
- Charge tax on shipping rates: This includes shipping rates in the tax calculation. For many countries across Europe, North America, and Oceania, shipping rates are automatically calculated.
- Charge VAT on digital goods: This adds VAT at the checkout stage for EU customers.
3. Pick Your Desired Tax Rates and Tailor Settings for Specific Products
As mentioned, one of the challenges of applying sales tax is that it can differ from product to product. You might have multiple items on your site with different rates that you have to adjust taxes for. For example, the UK doesn’t charge VAT on ebooks.
To make products tax-exempt, you need to use a Shopify feature called ‘Tax Overrides.’ While this feature is complicated, it’s worth learning to manage individual rates more effectively.
First, you’ll need to create a new collection in your store. Collections have many purposes, such as upselling and promotions, but here, we’ll just focus on the taxation side.
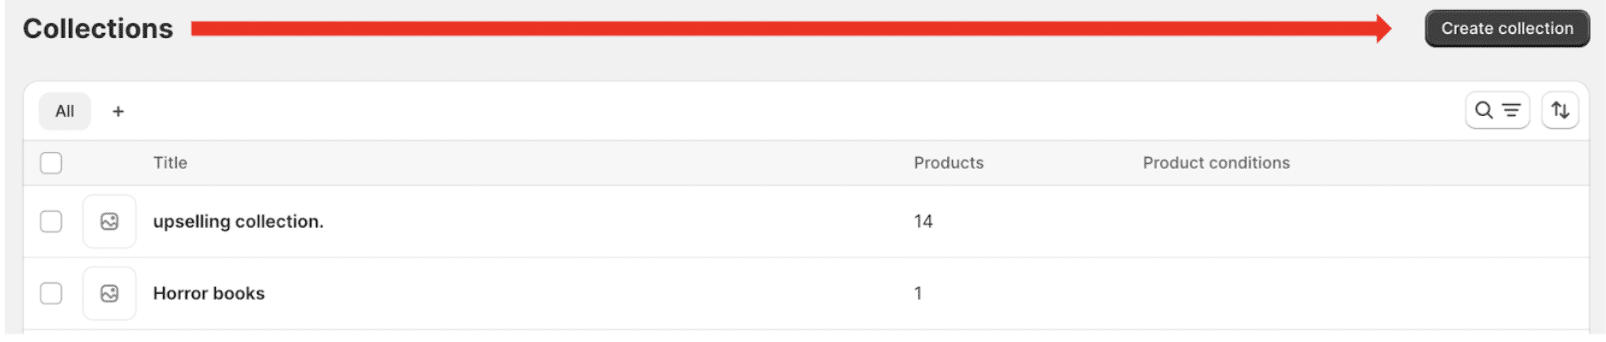
To create a collection, navigate to Products > Collections. The following screen will show a list of all the groups already in your store. Choose ‘New collection.’
Next, you need to name your collection and add a variety of conditions. Make sure to select a manual collection type, as this allows you to add products one at a time.
Now, you need to head back over to the ‘Taxes and Duties’ page. Next, choose the country that you want to add the override to. From here, look for Tax Overrides > Add a Tax Override, where you’ll have the option to choose a product and specify its tax rate.
4. Recognize and Oversee Customers Who Qualify for Tax Exemptions
Not all your customers will be eligible to pay tax, and it’s important your e-commerce site accommodates them. The good news is that doing so is pretty straightforward.
From your Shopify Admin, head to Customers. This page lists every shopper who has bought a product from your site. Scroll down the list until you find the customer you want to exempt, then click their name. You’ll get an overview of their buyer profile, with information ranging from a purchase history to the total amount spent on your site.
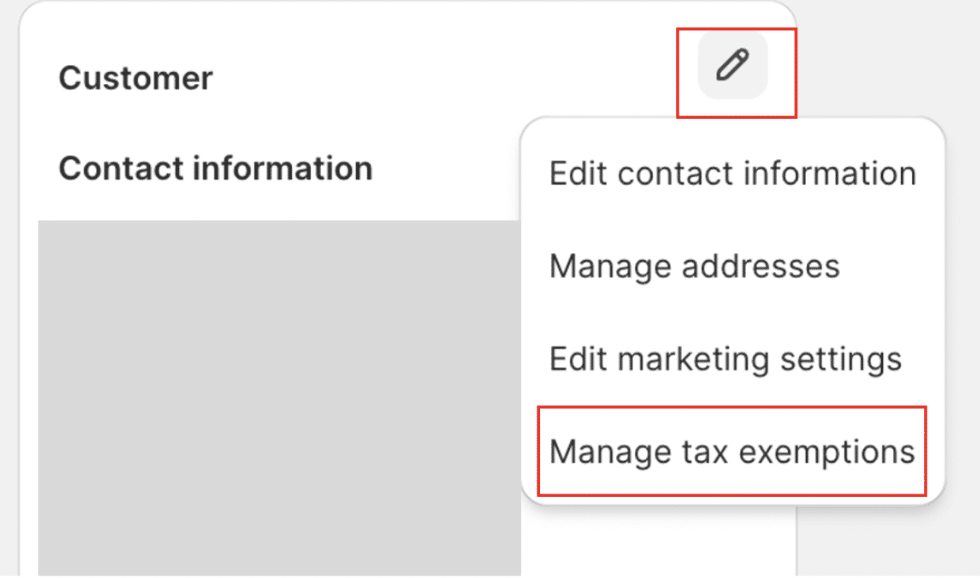
Select the pencil icon in the top corner of the screen next to ‘Customer’ and then ‘Manage tax exemptions.’ Make sure that the box next to ‘Collect Tax’ is unticked, then choose ‘Save.’
You’ve successfully excluded a customer from paying tax on your site! They’ll also be able to see this on their invoice or receipt.
For a comprehensive solution that tracks, creates, and sends personalized invoices, invest in invoice billing software. This software can track, create, and send personalized invoices that display the rate of tax for each customer.
5. Perform Tax Calculation Tests to Address Any Potential Issues
After you’ve got the right tax setting enabled for your store, there’s one last area to think about creating and filing tax reports. And when you send reports to the relevant tax authority, it’s vital they’re completely correct.
Here, you can’t leave anything to chance because incorrectly filed taxes could incur thousands of dollars in fines, for example, if the IRS finds that your error is due to negligence or disregard, you can be liable to pay 20% of the portion of the underpayment of tax. So, invest in some outside help from a professional tax consultant to make sure everything is correct.
Alternatively, if you’re self-employed or a sole trader, there are accounting solutions for freelancers that can help you track and manage your cash flow and help you comply with tax legislation. Seek a solution that can help you to be self-assessment-ready.

Shopify has created some tax reports to make life easier for you. To access these, go to Analytics > Reports > Taxes.
Shopify has provided several features to help with tax reporting. The first is the ‘Taxes finance report,’ which offers a summary of all sales tax applied on your site. The other available option is the ‘Sales finance report,’ which provides information on total sales amounts and billing.
Again, these reports alone won’t be enough to make sure that you file taxes correctly. Take care to make your own reports and seek help where needed.
6. Keep Up-to-Date With Tax Regulations for Compliance
International sales tax laws are complex and ever-changing. Governments rewrite policies all the time. One day you might be charging the correct rate and the next, you’re at risk of a fine.
Keeping constantly updated with tax regulations will help you avoid costly fees and stressful legal issues. If you’re a big organization, there’s a good chance you’ve got a team to handle this. Smaller businesses, on the other hand, probably don’t have dedicated accountants and may need to outsource compliance management or invest in compliant tax and finance software.
Streamline Shopify Accounting With MyWorks
MyWorks syncs data between your Shopify store and accounting software like QuickBooks and Xero. This means that every sale, refund, or adjustment made in Shopify is immediately reflected in your accounting records — making it easier to reconcile sales taxes. Learn more about how to automate your Shopify accounting with MyWorks, or check out MyWorks e-commerce accounting automation features for Shopify.
Shopify Sales Tax FAQs
Find answers to common questions about adding sales tax to Shopify checkout.
1. How Do I Collect Sales Tax on Shopify?
To collect sales tax on Shopify, enable the Shopify Tax feature in your store settings and set up and specify tax rates, including for specific product types with unique tax requirements. You can also use tools like MyWorks to sync Shopify data with accounting software for efficient tax reconciliation.
2. Does Shopify’s Total Sales Include Tax?
Yes, Shopify’s total sales figures typically include tax. The comprehensive sales amount you see in your Shopify dashboard generally encompasses the tax collected on sales, depending on how you’ve set up your tax settings. To view or adjust how taxes are handled or to see sales figures exclusive of taxes, you can explore the tax settings and reports section within your Shopify admin.
3. Why is it Necessary to Include Sales Taxes Upon Shopify Checkout?
It’s necessary to include taxes upon checkout because it’s a legal requirement to collect them from customers at the point of sale and report them. By avoiding this step, you’ll find yourself in hot water with your local tax authorities and your clientele.