The month-end close in QuickBooks is a familiar ritual for ecommerce accountants and business owners using QuickBooks Desktop. But even if you’ve mastered the routine, is it truly efficient—or just eating up hours you can’t afford to lose?
The truth is, this essential process holds hidden opportunities. With the right tools and automation, your QuickBooks month-end close checklist can shift from a tedious process to a streamlined system that delivers cleaner books, faster reconciliations, and sharper financial insights.
This guide goes beyond the basics. We’ll show you how to close the books monthly in QuickBooks Online and optimize your QuickBooks Desktop month-end workflow for the realities of ecommerce accounting. We’ll tackle complex reconciliations, eliminate manual entry, and unlock time-saving automation that scales with your business.
Why Automate Your Month-End Close? (It’s About More Than Just Saving Time)
Closing the books is essential—but optimizing the process through automation delivers deeper, strategic value for growing ecommerce businesses. It’s not just about efficiency; it’s about enabling smarter decisions, scalability, and control.
Here’s what automation unlocks:
- Sharper decision-making: an automated month-end process reduces human error and produces accurate financial data you can trust—essential for making informed calls on inventory, pricing, marketing spend, and long-term strategy.
- More time, less stress: automating data entry and repetitive reconciliation tasks can save 10-15 hours weekly. That’s time better spent on analysis, growth planning, or client relationships.
- Faster problem detection: a consistent, automated close highlights red flags—like cash flow issues or margin shrinkage—early, so you can act before they become problems.
- Scalable systems for growth: as your transaction volume increases, manual processes create bottlenecks. Automation builds a financial engine that scales with your business—without needing more headcount.
Now that the benefits of a smooth close are clear, it’s time to lay the groundwork. A successful close month in QuickBooks doesn’t start when you open QuickBooks; it begins with having the right systems and resources.
Preparing for Your QuickBooks Desktop Close: Pre-Checks
Before diving into your QuickBooks Desktop close, a bit of prep work goes a long way. These pre-checks help prevent errors, delays, and unnecessary backtracking later on.
- Source documents: gather all necessary statements: bank accounts, credit cards, sales channel summary reports (Shopify, Amazon, etc.), and payment processor statements (PayPal, Stripe, etc.).
- Routine bookkeeping: ensure that daily tasks like entering bills, issuing invoices, and recording customer payments are up to date. Any backlog here will complicate your close.
- QuickBooks file integrity: make sure your QuickBooks software is responsive, and your data file is healthy. It’s a good habit to run the Verify Data utility (File > Utilities) before starting your close. If any issues are detected, follow up with the Rebuild Data tool to repair them.
| Pro tip: Set up automatic backups in QuickBooks Desktop to protect your financial data in case of corruption, software glitches, or hardware problems. |
Tackling Common Ecommerce Reconciliation Challenges
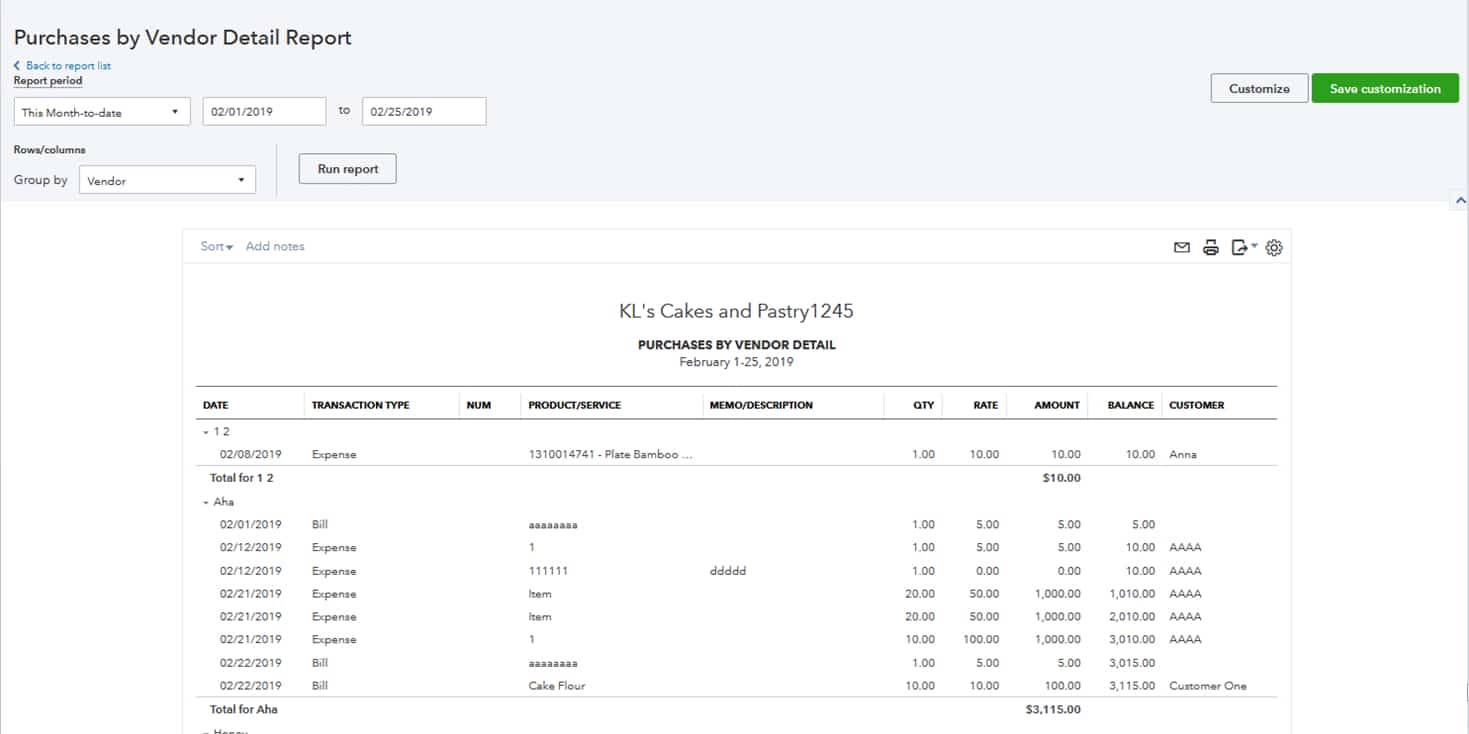
For ecommerce businesses, the standard QuickBooks reconciliation process can fall short. The nature of online transactions adds complexity that traditional workflows don’t always accommodate. Some common headaches include:
- Marketplace fees: platforms like Shopify or Amazon deduct various transaction and service fees before issuing payouts.
- Lump-sum deposits: one bank deposit may represent hundreds of individual transactions, making reconciliation difficult without granular data.
- Returns and chargebacks: properly accounting for refunds, restocking fees, and disputed payments requires extra steps and precision.
Optimized QuickBooks Desktop Month-End Close Checklist
A reliable checklist is essential for a smooth and accurate QuickBooks Desktop month-end close—especially for fast-moving ecommerce businesses. Follow these proven steps to stay organized, reduce errors, and close your books with confidence.
Step 1: Capture All Transactions
- Enter any outstanding vendor bills or expense receipts in QuickBooks.
- Confirm all sales revenue is posted—including income from every ecommerce platform.
- If using third-party order sync tools, verify that no orders are missing or duplicated.

Step 2: Reconcile Bank and Credit Card Accounts
- Launch the Reconcile tool for each account.
- Enter the statement’s ending balance and end date exactly as shown.
- Match all transactions in QuickBooks to the bank statement.
- Investigate discrepancies immediately—your goal is a $0 difference.

Step 3: Reconcile Payment Processors and Sales Channels
- Match payout reports (Shopify Payments, Stripe, PayPal, etc.) to actual bank deposits.
- Break out and record all transaction fees, platform fees, refunds, and chargebacks.
- Post necessary journal entries or map items precisely for accurate profit margins.
Step 4: Review A/R and A/P
- Open the Accounts Receivable Aging report. Follow up on any overdue invoices.
- Review the Accounts Payable Aging report to confirm upcoming bills are scheduled for payment.

Step 5: Verify Inventory (If Applicable)
- Perform a physical inventory count or cycle count.
- Make any necessary quantity adjustments in QuickBooks.
- Confirm that inventory-related journal entries (COGS, shrinkage) are correct.
Step 6: Record Accruals and Prepaid Expenses
- Accrue for expenses incurred but not yet billed (e.g., software, utilities).
- Record usage of prepaid expenses for the month (e.g., insurance, subscriptions).
Step 7: Review Fixed Assets and Depreciation
- Post monthly depreciation entries according to your fixed asset schedule.
- Confirm any new asset purchases are properly categorized.
Step 8: Sales Tax Review & Filing
- Generate the Sales Tax Liability report.
- Verify collected amounts align with sales records and platform reports.
- File and submit returns to the appropriate jurisdictions.
Once all month-end tasks are complete, it’s time to pull the key reports that turn raw data into actionable insights.
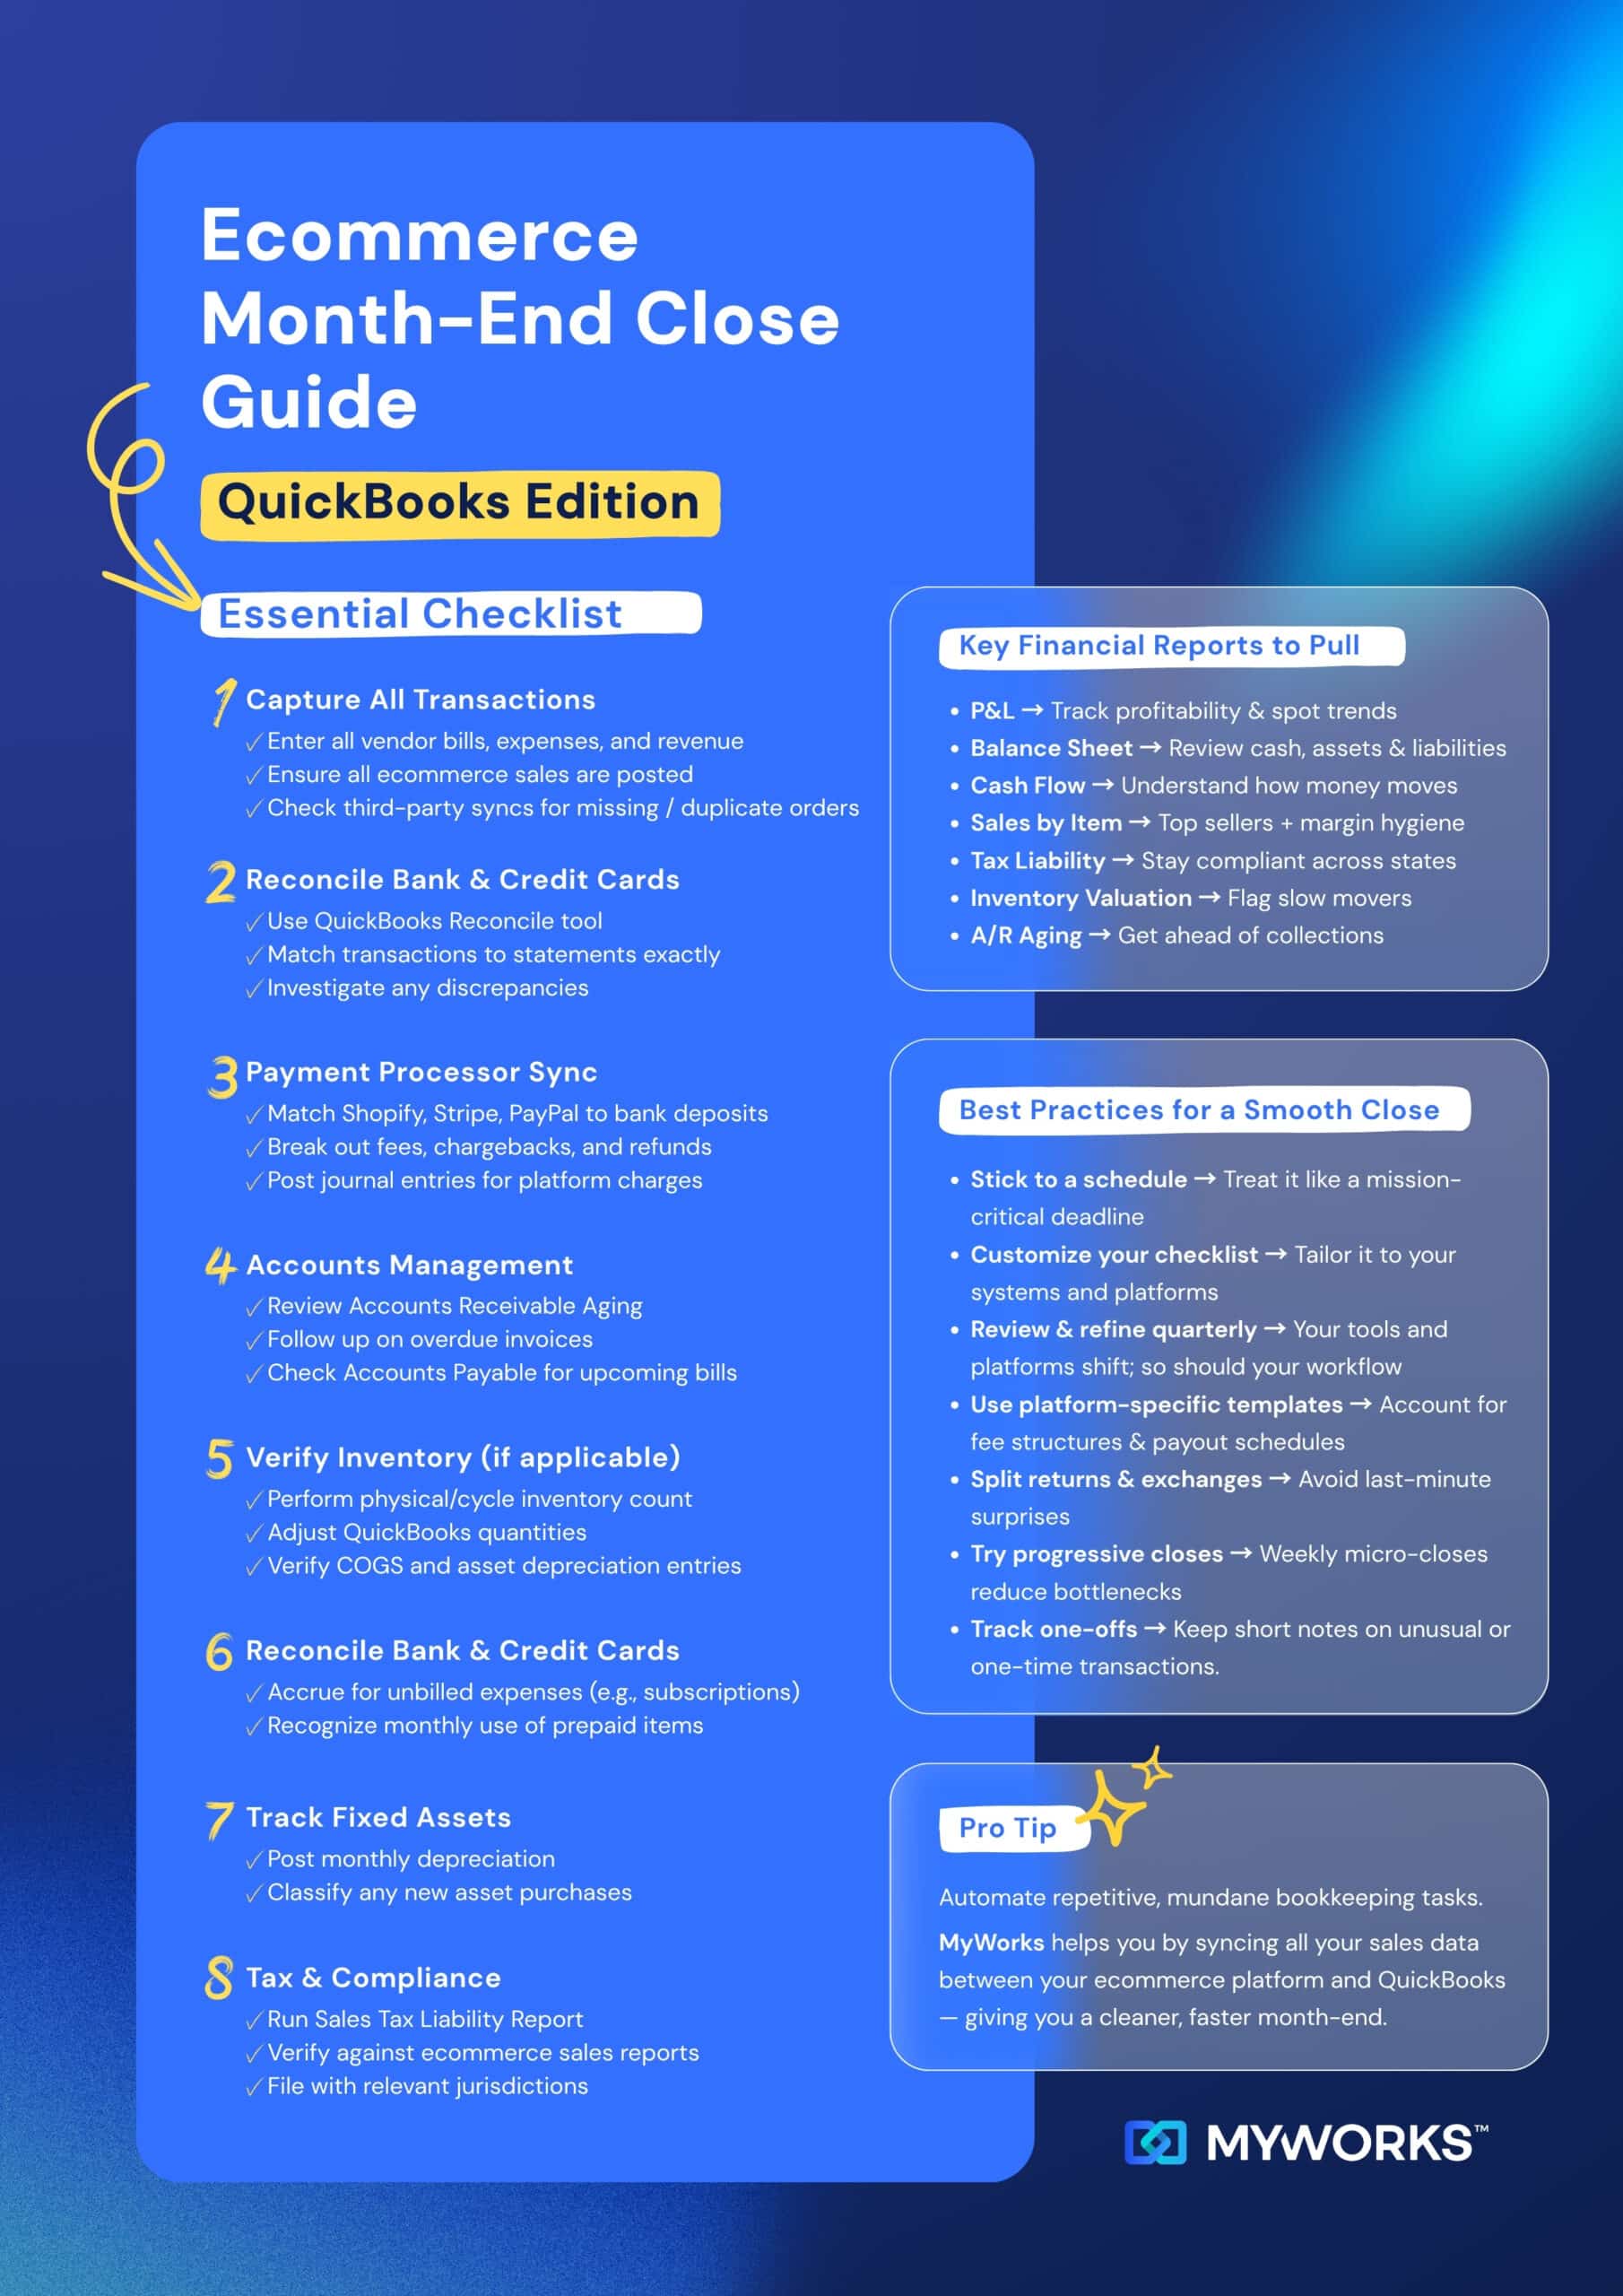
Reviewing Key Financial Reports in QuickBooks Desktop
With your month-end close complete and data verified, reviewing key reports gives you insight into your financial performance and highlights areas that may need attention.
- Profit and Loss (P&L): quickly assess overall profitability. Compare current revenue and major expenses to previous periods or your budget to spot trends.
- Balance Sheet: get a snapshot of your financial position—assets, liabilities, and equity. Pay close attention to cash balances and accounts receivable.
- Statement of Cash Flows: understand how cash is moving through your business. See where it’s coming from (operations, financing, investing) and where it’s going.
- Sales by Item Detail: for ecommerce businesses, this report is invaluable. Identify top-performing products, spot declines, and recognize seasonal shifts. Cross-check with COGS to see which items have the healthiest margins.
- Sales Tax Liability: essential for multi-jurisdictional compliance. Ensure taxes are properly collected and remitted in every region where you have nexus.
- Inventory Valuation Detail: use this to flag slow-moving inventory and stock discrepancies, and to inform future purchasing decisions.
- Accounts Receivable Aging: if you offer B2B terms or payment plans, this report helps you stay ahead of collections and reduce aging receivables.
Having accounting automation tools working behind the scenes ensures the accuracy of the data feeding these reports—so you can trust the numbers you’re reviewing instead of second-guessing them.
Best Practices for a Consistently Smooth Close
Even the best checklist is only as good as the process around it. These tips will help you maintain momentum and reduce errors with each close.
- Schedule relentlessly: treat month-end close like a non-negotiable meeting. A set schedule prevents backlog and builds routine.
- Document your workflow: maintain a checklist tailored to your business setup and tools—then follow it every time.
- Review periodically: revisit your process every quarter. Have platforms or fee structures changed? Update your workflow accordingly.
- Use platform-specific reconciliation templates: create templates for each sales channel (Shopify, Amazon, WooCommerce, etc.) that account for their unique payout timing and fee structures. This speeds up reconciliation and minimizes guesswork.
- Separate returns and exchanges: establish a specific process for handling returns, restocking fees, and items in transit. This prevents last-minute surprises during close.
- Try progressive closes: consider weekly mini-closes for high-volume areas like sales reconciliation. This spreads out the workload and makes issues easier to catch and fix.
- Document one-offs: keep short notes on unusual or one-time transactions. This builds institutional knowledge and simplifies audits and tax prep.
Small automations—like syncing payouts and recording fees with MyWorks—let your team stay focused on reviewing insights and making strategic decisions rather than hunting down missing data.
| MyWorks offers robust syncing for QuickBooks, enabling real-time automation between your ecommerce store and desktop accounting setup. |
Streamlining Your Close: Automation with MyWorks
Once you’ve nailed down a consistent month-end workflow, automation can help scale and simplify it, especially when dealing with large volumes of ecommerce data.
MyWorks syncs your online store (like Shopify or WooCommerce) directly to QuickBooks Desktop, working in the background to sync all sales details and minimize the need for manual data entry or reconciliation. Once the initial setup is complete, MyWorks automatically syncs orders, fees, and customer records in near real-time or on your chosen schedule.
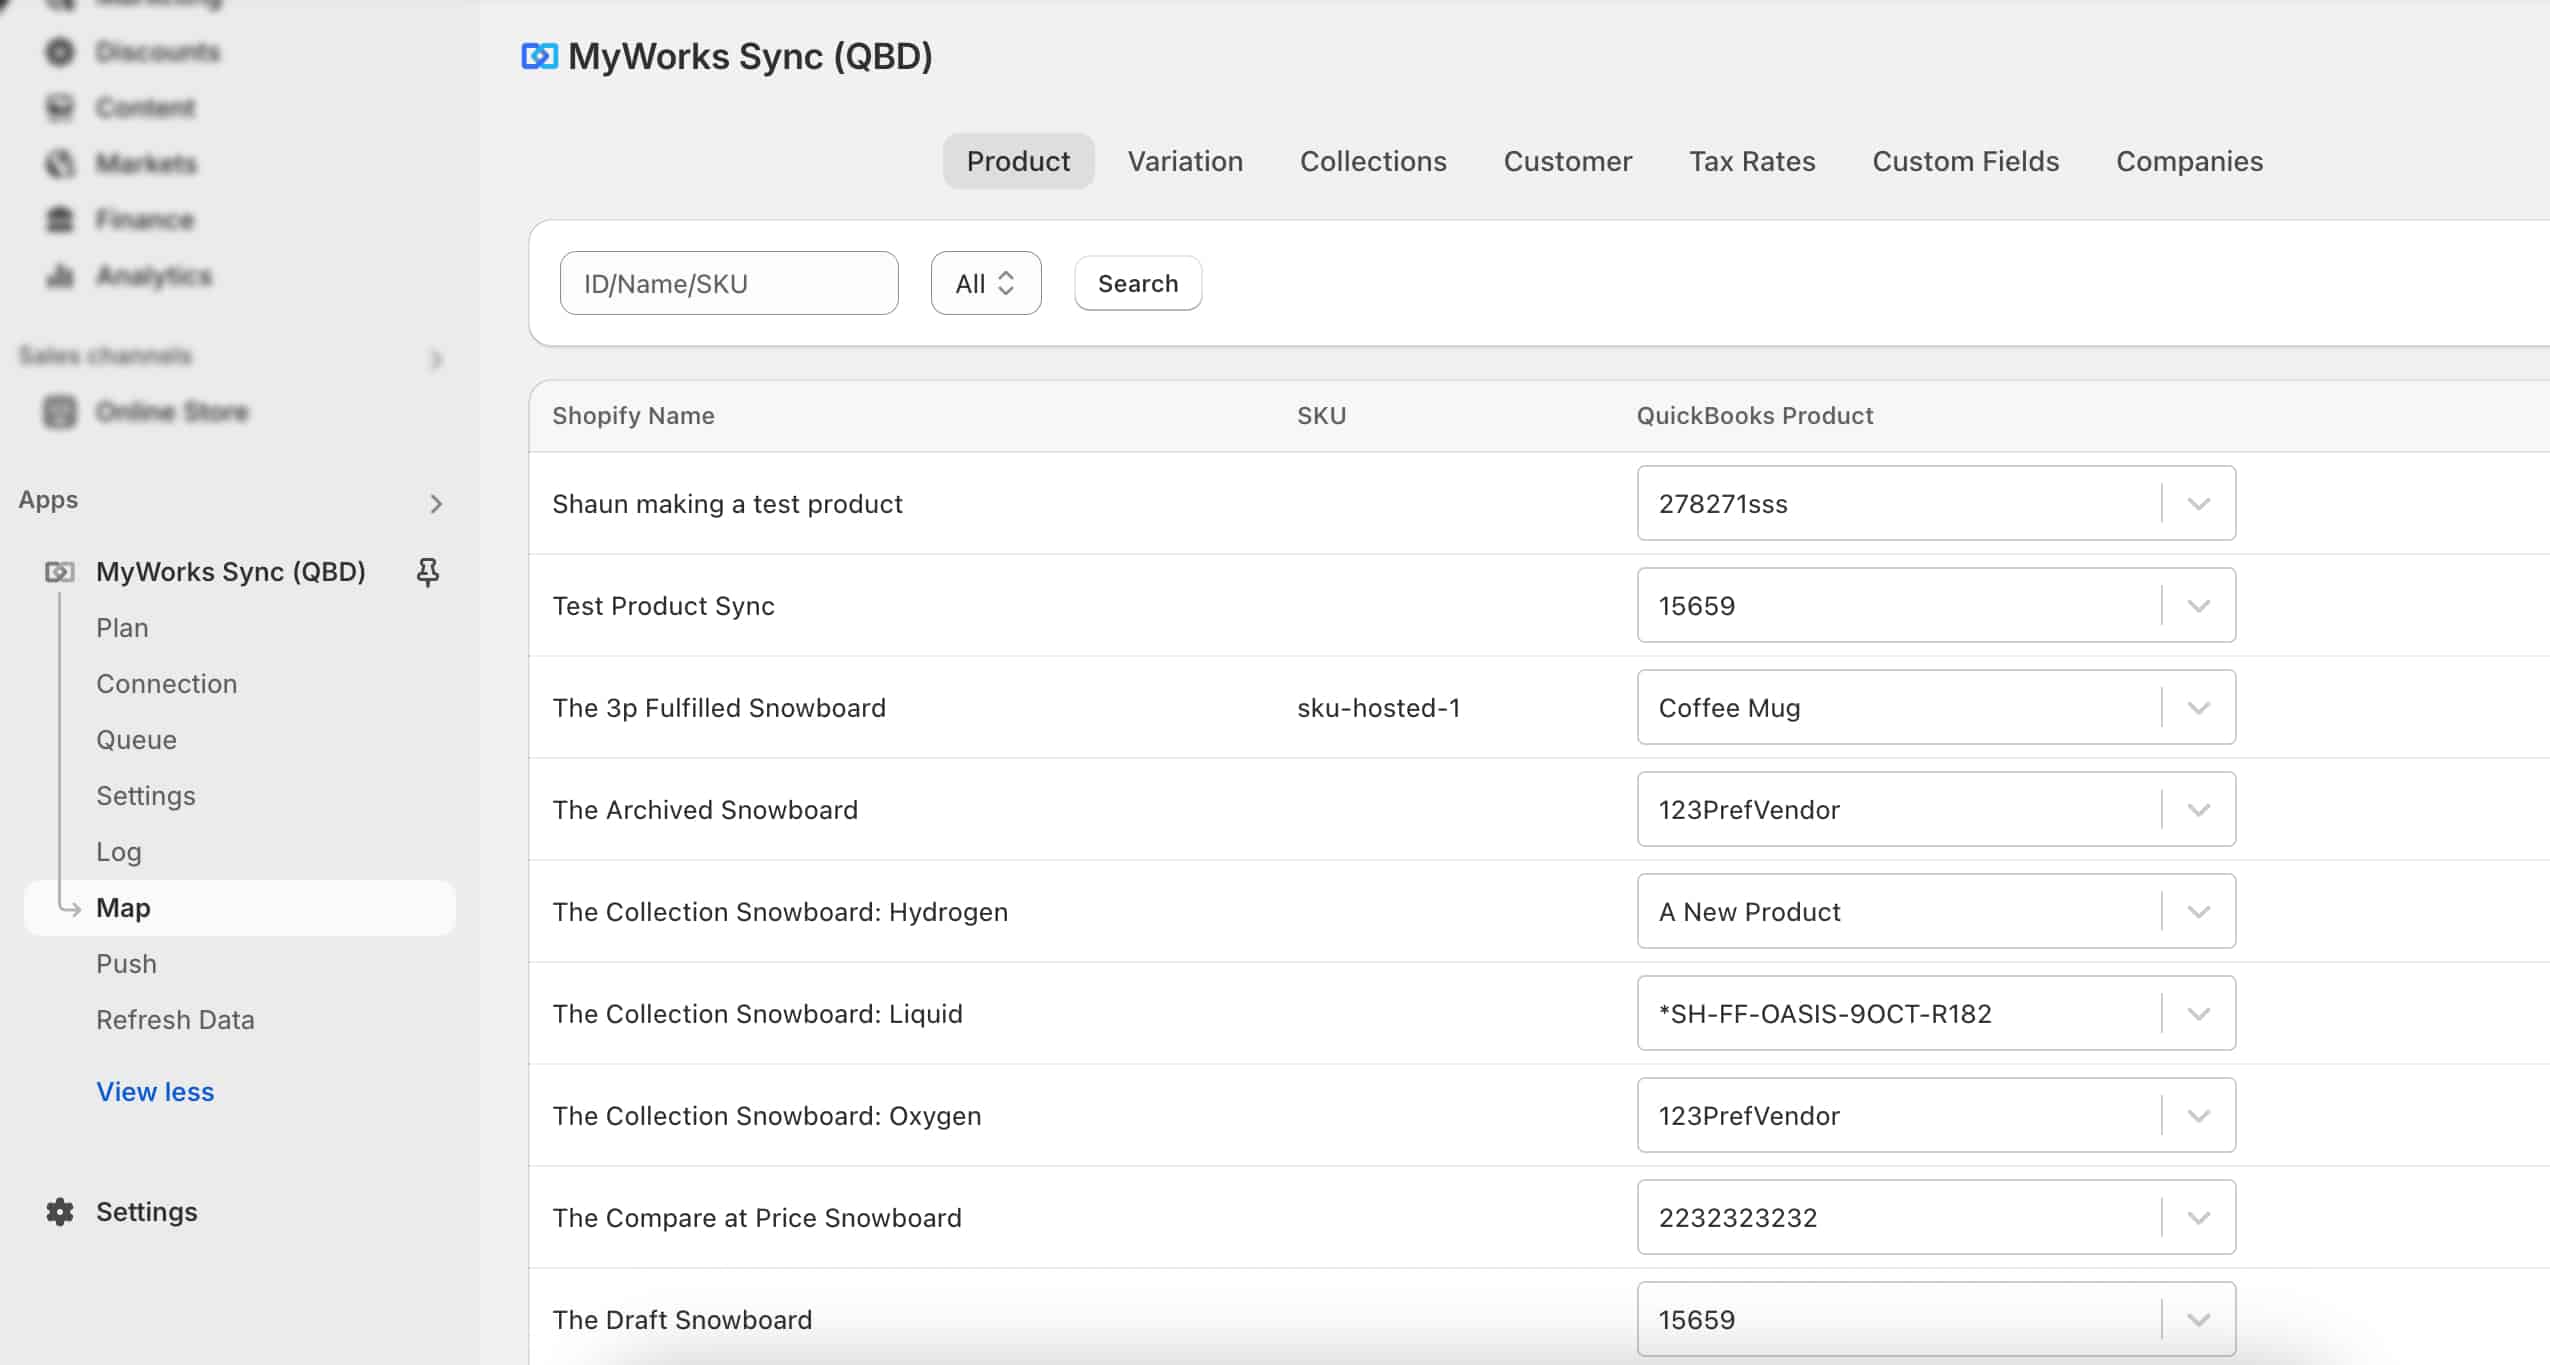
Seamless Transaction Syncing
MyWorks automatically transfers every order detail into QuickBooks Desktop—customer info, product SKUs, quantities, discounts, taxes, shipping, and payment data (including processing fees). This eliminates repetitive order entry and helps ensure consistency between systems.
Smarter Reconciliation
MyWorks doesn’t just push data—it brings in payment processor details line by line, including fees and payout splits. That means matching lump-sum deposits from Stripe, PayPal, or Shopify Payments is far easier, reducing time spent tracking down discrepancies. It can also auto-create customers, map payment methods, and link transactions to the correct accounts—accelerating your close and minimizing manual fixes.
Cleaner Financial Reporting
By maintaining accurate and consistent data across systems, MyWorks helps ensure that your key reports—like P&L or Balance Sheet—are always up-to-date and reliable. With fewer manual entries or journal adjustments, you’re less likely to second-guess the numbers at month-end.
MyWorks also supports bidirectional syncs: issue a refund in your ecommerce platform, and it’s reflected in QuickBooks. Update a product price, and it flows both ways. That means fewer manual fixes during close—even for tricky scenarios like partial refunds or exchanges.
Automating Fee Recording with MyWorks
Transaction fees from platforms like Stripe or PayPal often complicate reconciliation since they’re deducted before deposits hit your bank. This makes matching payouts tricky and often requires manual fixes.
MyWorks automates this by mapping fees directly to the correct expense accounts in QuickBooks Desktop—no manual calculations or cleanup needed.
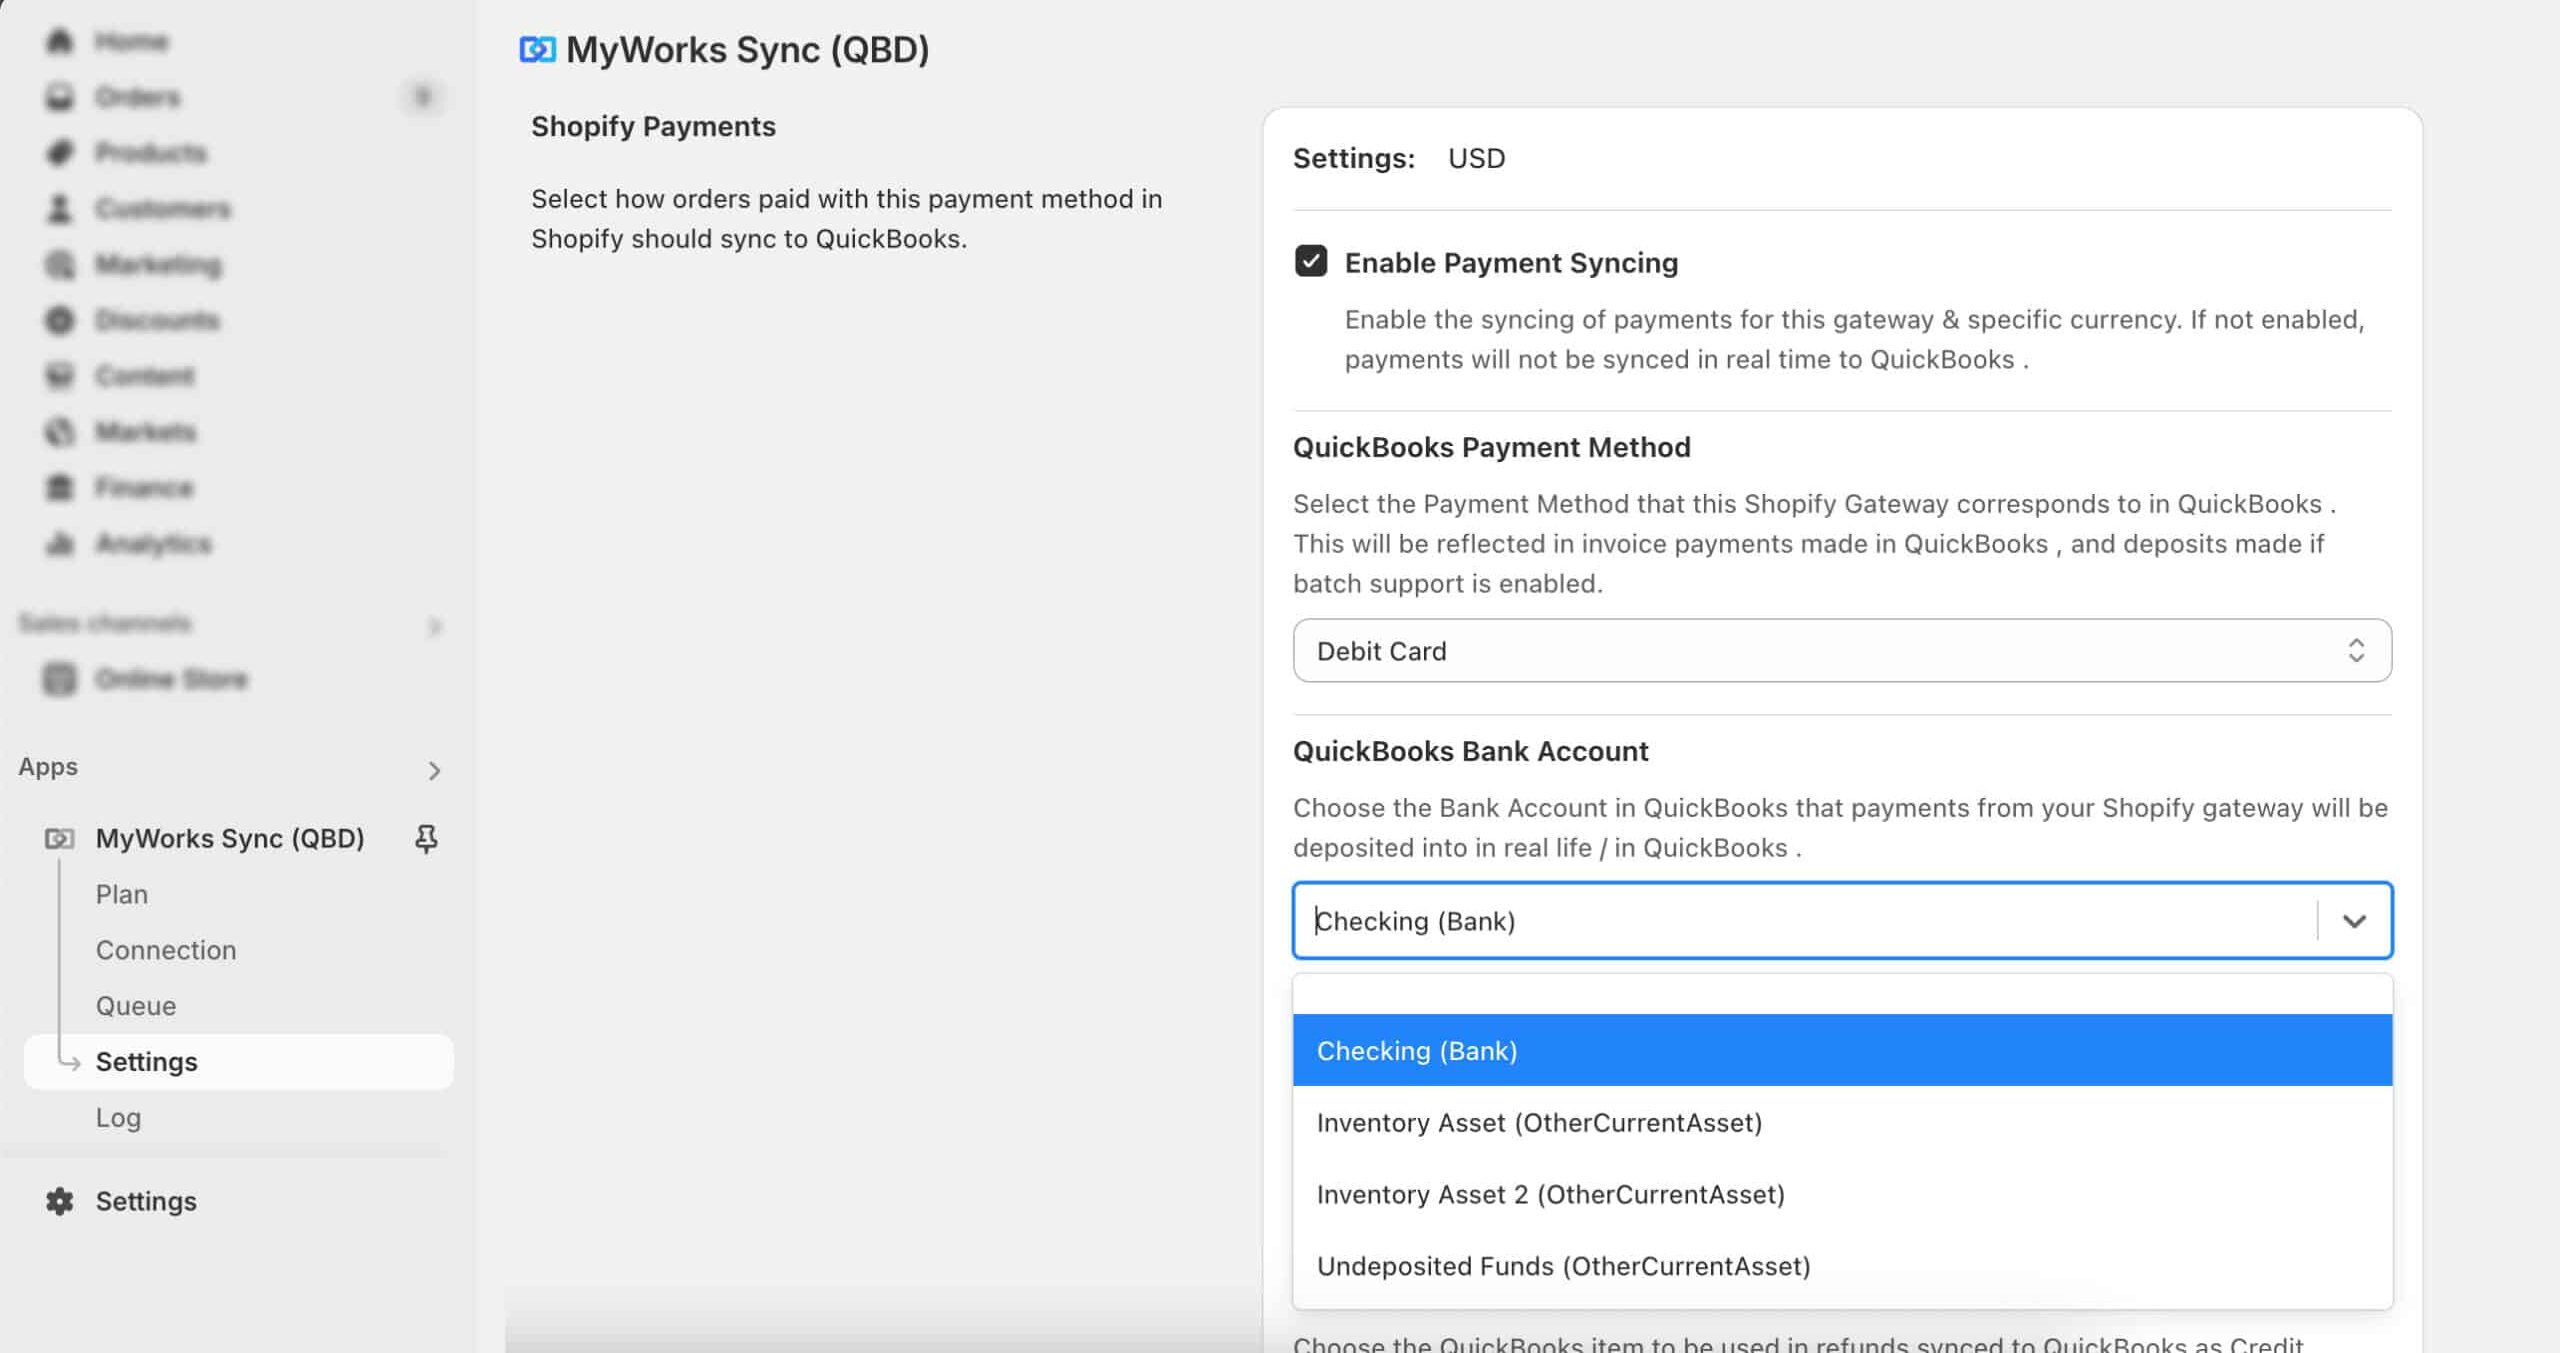
Here’s how to set it up:
- In your store’s backend, open the MyWorks app and go to Settings > Payment Methods
- Configure how each payment should sync to QuickBooks (including enabling syncing transaction fees)
- Use dropdowns to map those fees to your Chart of Accounts.
- Save—MyWorks handles it from there.
Fees are recorded line-by-line alongside their corresponding orders and deposits, making reconciliation faster and more accurate.
Ready to Simplify Your Close?
Automating repetitive tasks frees you to focus on what matters—analyzing results, planning ahead, and growing your business. With MyWorks, you can streamline your QuickBooks Desktop workflows, reduce manual reconciliations, and close the books with greater confidence.
Want to see it in action? Book your personalized MyWorks demo to explore how automation can simplify your month-end.
FAQs About QuickBooks Desktop Accounting Month-End Close
1. What’s the Difference Between QuickBooks Online and Desktop for Month-End Closing?
Both follow the same accounting principles, but QuickBooks Desktop offers more robust features—particularly for high-volume ecommerce businesses. This guide focuses on QuickBooks Desktop, where tools like MyWorks provide powerful automation to streamline the month-end close. Read our QuickBooks Online vs Desktop comparison for more insight.
2. How Long Should an Ecommerce Month-End Close Take in QuickBooks Desktop?
It depends on transaction volume and complexity. Manual month-end closing—especially across multiple sales channels—can take several hours. Automating your workflow with tools like MyWorks can significantly reduce this time by syncing sales and payment data directly into QuickBooks Desktop.
3. What’s the Most Efficient Way to Reconcile Payouts from Multiple Ecommerce Platforms?
Manual reconciliation by comparing payout reports to bank deposits is tedious and error-prone. For faster, more accurate ecommerce reconciliation, use automation tools like MyWorks to sync sales data as individual orders. This streamlines the matching process and accelerates your month-end close in QuickBooks Desktop.
4. How Can I Reduce Errors During the Month-End Close Process?
Consistency and documentation help, but the biggest risk is manual data entry. Using automation to sync ecommerce sales, fees, and payouts directly into QuickBooks Desktop helps eliminate typos and missed transactions—resulting in cleaner books and fewer close-day corrections.