



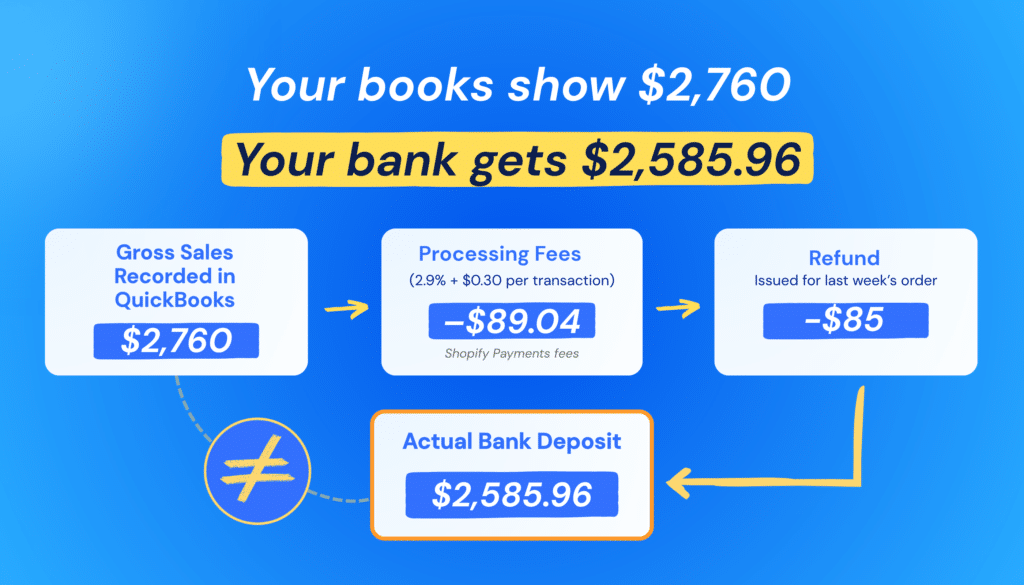
Your bank shows a payout of $2,585.96, while Shopify reports $2,760.00 across 30 orders. The difference is normal: Shopify deducts fees, refunds can be included in a later payout, and cash arrives after the related sales have already been recorded.
The cleanest way to handle this is to route Shopify sales through a clearing account, then use each payout to move the settled amount out of that account, record the fees, and match the cash that reaches your bank.
For stores using MyWorks, that process can be automated: MyWorks syncs the underlying sales and refunds, then creates the payout journal entry from Shopify’s actual payout data. You still review and match the bank transaction, but you do not need to rebuild every payout by hand.
This guide covers both approaches. Start with the automated route if you want to remove the repetitive work; use the manual steps when you are setting up the workflow, catching up historical payouts, or prefer to handle entries yourself.
TL;DR: Reconciling Shopify Payouts in QuickBooks Online
| Option | How it works |
| Automate with MyWorks | MyWorks syncs sales and refunds to your Shopify Clearing Account, then creates a balanced journal entry for each Shopify Payments payout using the actual sales, refunds, fees, and net cash. When the bank transaction arrives, review and match it in QuickBooks Online. |
| Reconcile manually | Pull the Shopify payout report, route sales through a clearing account, create a journal entry for the payout, match the bank transaction, and review the clearing account balance. |
Two things before you start:
- Your Shopify sales need to be posting to QuickBooks Online already. If the only Shopify transactions in your books come from the bank feed, set up sales syncing first with our guide to recording Shopify sales in QuickBooks Online.
- This guide is for QuickBooks Online. The accounting principles are similar in QuickBooks Desktop, but the setup differs. See our QuickBooks Desktop guide for that workflow.
What’s Inside a Shopify Payout?
A Shopify payout is never a direct copy of your gross sales. Your money changes shape between the initial customer checkout and the final deposit. Four things influence what lands in your bank, and when:
1. Orders Get Grouped (The Timing Gap)
Shopify batches transactions instead of sending individual orders. Payouts run on business days, but can also be split across multiple days, so funds captured on Friday, Saturday and Sunday arrive as a single batch. For a store doing seventy orders a week, that is one bank line covering roughly 30 orders. If you have switched your payout schedule to weekly or monthly, the batches get bigger, and the gap gets wider.
2. Processing Delays
Funds sit for two to seven business days, depending on your region, typically three days for US stores. Your bank then takes another 1 to 3 days to display them. Because of this lag, a sale captured on the 30th of the month often lands in the next month’s bank statement.
3. Fees Come Out First
Payment processing fees are deducted before the cash ever leaves Shopify. If you are on the Shopify Basic plan, the standard US online rate is 2.9% plus 30 cents per transaction.
Across 30 orders totaling $2,760, that works out to $80.04 in percentage fees plus $9.00 in fixed fees, meaning $89.04 is gone before the deposit hits your bank. Treat that arithmetic as illustrative only: your real fees will differ, and Step 4 explains why you should always pull the exact figure from Shopify rather than calculating it.
4. Refunds Reduce the Next Payout
A refund is not deducted from the payout containing the payment it belongs to. Shopify takes it from your next available payout, so an $85 refund issued for last week’s order reduces today’s deposit. Chargebacks behave the same way, and if you want to cut down how often you deal with them, we cover that in our guide to preventing chargeback fraud.
Go deeper: For the full diagnostic on every way this breaks across gateways, read why your payouts don’t match your books.
What You Need Before You Reconcile
Before setting up your accounts or downloading CSV reports, make sure you have the following ready:
- A QuickBooks Online user role that can add accounts, such as a standard user with full access, is enough.
- Staff or Admin access to your Shopify admin dashboard under Finance > Payouts.
- A dedicated business bank account connected to QuickBooks Online via Bank Feeds.
- Your sales entry method chosen: A clear plan for whether you post sales as individual Sales Receipts or daily summarized Journal Entries.
Step 1: Pull the Payout Report from Shopify
You cannot reconcile what you cannot see. Before opening QuickBooks, gather the exact breakdown of the payout batch directly from Shopify.
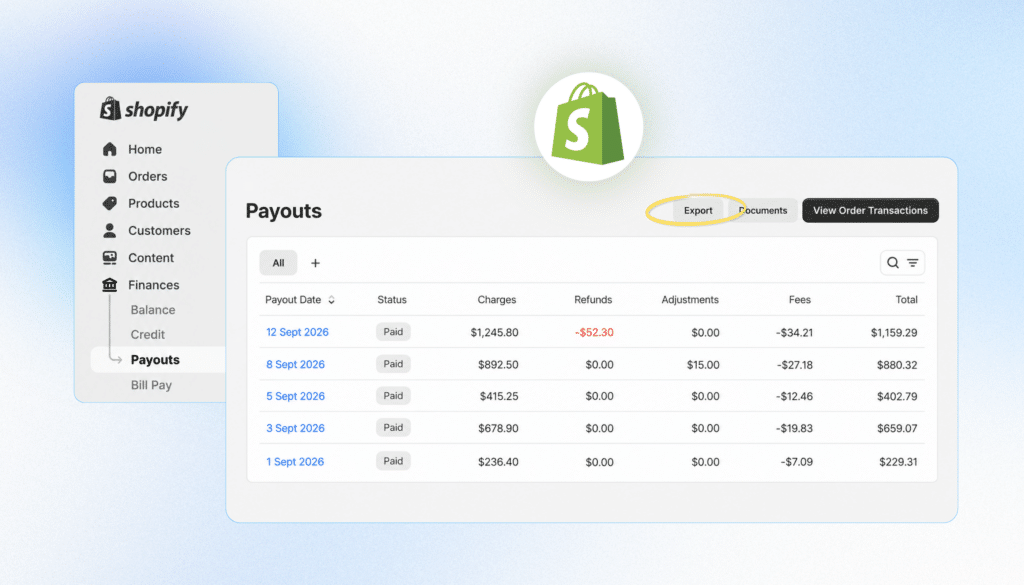
- Log in to your Shopify Admin dashboard.
- Navigate to Finance > Payouts. Payouts only appear if you use Shopify Payments as your provider. You can also reach the same data from Settings > Payments > View payouts.
- Click on the specific payout date you want to reconcile.
- Review the payout summary or click Export to download the CSV for that batch.
| Pro Tip: Keep this payout report open in a separate tab or print the CSV summary. You will need four figures for Step 4: Charges ($2,760.00), Refunds ($85.00), Processing Fees ($89.04) and Net Payout ($2,585.96). Charges less refunds is your gross settled amount ($2,675.00); Shopify does not show that as its own line, so you work it out yourself. |
Step 2: Create a Clearing Account in QuickBooks Online
To prevent Shopify sales from prematurely cluttering your real bank account before cash actually arrives, you need a temporary holding tray inside QuickBooks.
In accounting, this is called a Clearing Account (or suspense account). It acts as a digital transit station where sales wait until Shopify batches and releases the money.
How to Create the Clearing Account
- In QuickBooks Online, go to All apps > Accounting > Chart of accounts. (If your QuickBooks has not moved to the updated design yet, this lives under Settings > Chart of accounts or Accounting > Chart of accounts: the path differs between Business view and Accountant view.)
- Click New in the top right corner.
- Configure the account settings:
- Account Type: Select Bank (Creating it as a Bank-type account gives it a dedicated register in QBO, making it easy to view running balances).
- Detail Type: Select Cash on hand or Checking.
- Account Name: Type Shopify Clearing Account.
- Leave the Starting Balance at $0.00 and click Save and Close. Intuit’s clearing account guide is very clear on this: “Do NOT enter an opening balance.” A number typed there becomes a phantom balance that never clears.
Create Your Processing Fee Account (If You Haven’t Already)
While you are in the Chart of Accounts, check if you have an expense category for credit card fees. If not, create one now:
- Account Type: Expenses
- Detail Type: Bank Charges or Merchant Fees
- Account Name: Shopify Payment Processing Fees
Step 3: Point Your Sales Receipts at the Clearing Account
Now that your holding tray exists, instruct QuickBooks to route incoming revenue directly into the clearing account instead of your real checking account.
Whether you manually enter sales or sync them through an integration app, every sales transaction must be directed to the clearing account upon creation.
Individual Orders vs. Daily Summaries
How you post those sales depends on your store’s transaction volume:
- Individual Orders: Every Shopify order creates its own Sales Receipt in QuickBooks Online.
- Daily Summaries: A single daily Journal Entry or summary Sales Receipt aggregates total daily sales.
Individual orders keep the line-item detail your accountant can trace; summaries keep the volume down. We’ve broken down when to sync Shopify orders individually if you’re still deciding between the two approaches.
Setting the Deposit Location on Sales Receipts
When creating a Sales Receipt (+ Create > Sales receipt):
- Enter your line items, quantities, and sales tax as usual.
- Locate the Deposit to drop-down menu near the top or bottom of the form.
- Select Shopify Clearing Account ▼ (do not select your real Checking account).
What Happens Behind the Scenes
Every time a customer places an order on your store, the sale increases your Shopify Clearing Account balance. Record the weekend’s 30 orders, and your clearing register climbs to +$2,760.00. Issue the $85.00 refund and the Refund Receipt routes out of the Shopify Clearing Account, bringing the balance down to +$2,675.00.
Your real bank account stays untouched, because no cash has arrived yet. The funds sit in your clearing ledger waiting for payout day.
Step 4: Record the Shopify Payout as a Journal Entry in QuickBooks Online
Once the related sales and refunds have been recorded in your Shopify Clearing Account, use a journal entry to record the payout. This moves the settled sales out of clearing, records Shopify’s processing fees, and records the exact cash received in your checking account.
- In QuickBooks Online, select + Create > Journal entry.
- Set the Journal date to the date Shopify initiated the payout.
- Add the following lines using the figures from the Shopify payout report:
| Account | Debit | Credit | Description |
| Checking Account | $2,585.96 | Net Shopify payout received | |
| Shopify Payment Processing Fees | $89.04 | Shopify processing fees | |
| Shopify Clearing Account | $2,675.00 | Gross settled sales: charges less refunds |
The entry balances:
$2,585.96 + $89.04 = $2,675.00
In this example, the clearing account already holds $2,760.00 in sales less the $85.00 refund, leaving $2,675.00. Crediting that amount clears the settled balance; debiting the fee records the expense; and debiting checking records the cash that Shopify paid out.
Handling Refunds, Disputes, and Other Adjustments
- Refunds already recorded individually: When a Refund Receipt has already reduced the Shopify Clearing Account, credit only the remaining settled amount in the payout journal entry.
- Daily summary entries: When daily summaries already include refunds, do not add a separate refund entry. Doing so would reduce the clearing balance twice.
- Disputes or reserves: When Shopify holds a reserve or applies an adjustment, add the appropriate line to the journal entry, such as a Shopify Dispute Reserve liability account. The final debit to checking should always equal the exact payout amount shown in Shopify.
Pro tip: Use the exact fee shown in Shopify’s payout report. Estimating from a processing-rate percentage can leave a small difference that prevents a clean match later.
Step 5: Match the Payout Transaction in Your Bank Feed
After you save the journal entry, your books show the net cash received in checking. When the matching Shopify transaction appears in your bank feed, QuickBooks can link it to that journal entry.
- Go to Transactions > Bank transactions.
- Open the For Review tab for the checking account that receives Shopify payouts.
- Find the Shopify transaction, such as SHOPIFY PAYMENTS DEP $2,585.96.
- Review the suggested match. It should point to the journal entry you created in Step 4.
- Select Match, not Add.
If QuickBooks does not suggest the entry automatically, choose Find match and check the amount, date, and checking account used in the journal entry.
Do not select “Add.” Adding the bank-feed transaction creates a new entry instead of linking it to the payout journal entry you already recorded. That can duplicate cash or income in your books.
Step 6: Reconcile Your Clearing Account to $0.00
The final step proves that every dollar captured on Shopify either reached your bank or was properly accounted for as a processing fee.
One thing to get straight before you start: your clearing account is not meant to sit at zero permanently. It holds funds that are still on their way to you. It only reads $0.00 at rest, when every sale you have recorded has been paid out. Reconcile as of a payout date, not a calendar month end, or your ending balance will include sales that simply haven’t cleared yet.
- In QuickBooks Online, go to All apps > Accounting > Reconcile (or Settings > Reconcile on the older design).
- In the Account drop-down, select Shopify Clearing Account.
- Set the Ending Date to the payout date you are reconciling.
- Set the Ending Balance to whatever should still be in transit on that date—0.00 if you are fully caught up.
- Click Start Reconciling.
- Check off the Sales Receipts ($2,760.00), the Refund Receipt ($85.00), and the $2,675.00 credit to Shopify Clearing Account from the payout journal entry.
- When the Difference in the top right reads $0.00, select Finish now.
Intuit’s reconciliation guide covers what to do if it won’t zero out.
How MyWorks Automates Shopify Payout Reconciliation
The manual workflow is useful to understand, but it becomes time-consuming once payouts arrive daily or across a growing number of orders. Pulling reports, checking fees, and creating journal entries by hand also leaves more room for small errors that make clearing accounts harder to review.
MyWorks Sync automates the same workflow described above. It syncs Shopify sales and refunds to the clearing account you choose, then creates a balanced journal entry for each Shopify Payments payout using the payout data Shopify actually provides.
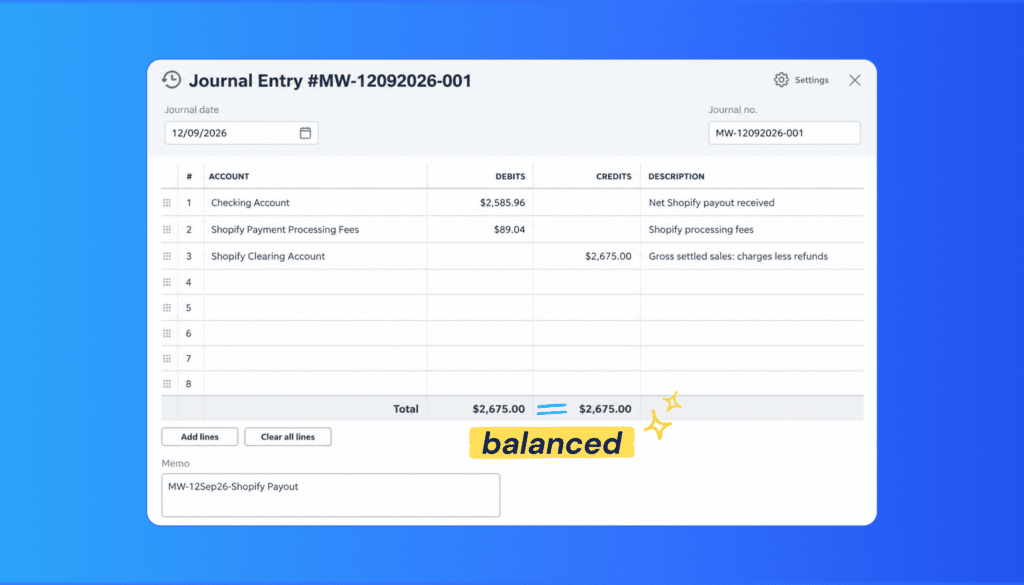
For each payout, MyWorks:
- Credits the settled sales amount from the Shopify Clearing Account.
- Debits the exact processing fees to your chosen expense account.
- Debits the net payout amount to the QuickBooks bank account where the cash arrives.
When the bank-feed transaction appears, the corresponding journal entry is already in QuickBooks and ready to match.
What Makes MyWorks Different for E-Commerce Reconciliation
1. A Clearing Account Per Payment Gateway
Most stores take money through more than one route. If a customer pays with PayPal, those funds never touch your Shopify Payments payout; they land in a separate merchant account on their own schedule.
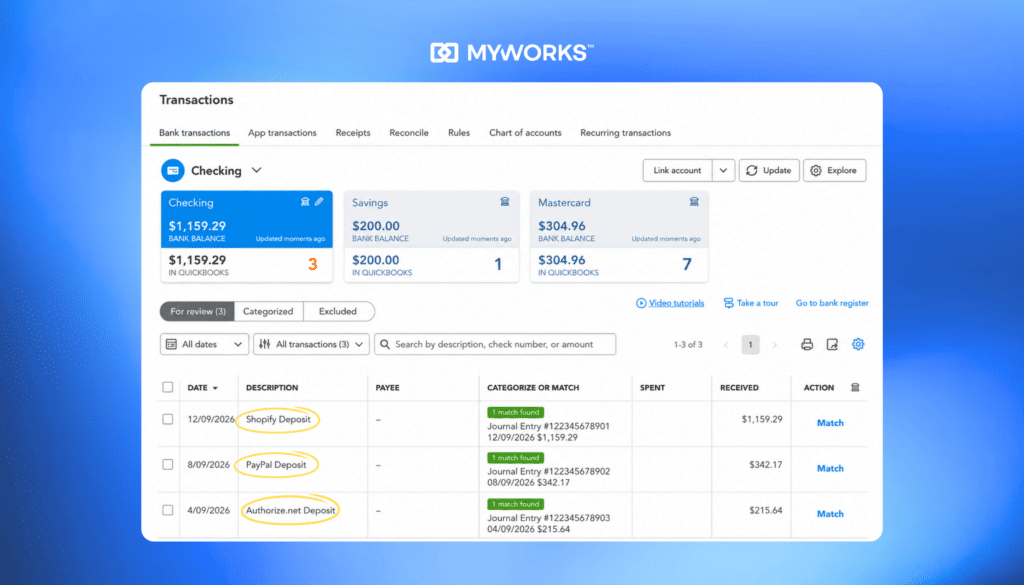
MyWorks lets you map each payment method in your store to its own QuickBooks bank account, so funds never pool together:
- Shopify Payments → Shopify Clearing Account
- PayPal → PayPal Clearing Account
- Authorize.net → Authorize.net Clearing Account
Worth knowing where the automation stops: MyWorks syncs payouts for Shopify Payments. Third-party processors don’t expose payout data the same way, so when a PayPal or Authorize.net deposit lands in your bank, you record a Transfer out of that gateway’s clearing account to clear it.
Each account still tells you exactly what is in transit from that provider; you just close the loop yourself. Payment method mapping is available on the Grow plan and above.
2. Sync Individual Orders or Daily Summaries
Whether your business model requires granular line-item detail for inventory and customer tracking or clean daily summary entries to keep your transaction count manageable, MyWorks supports both structures. Regardless of the order sync method you choose, payout batch entries always calculate down to the penny.
3. Multi-Currency Order Syncing
If you sell in USD, CAD, EUR and GBP, the exchange rate is one more thing standing between your orders and your books. MyWorks handles this on the order side. If the Shopify order’s currency is also enabled in QuickBooks, MyWorks keeps the order in that currency and passes the correct exchange rate through. If it isn’t enabled in QuickBooks, MyWorks converts the amounts into your QuickBooks base currency instead. You can also route orders to a different QuickBooks bank account per currency in Settings > Payment Methods, so each currency clears through its own account.
Payout syncing currently records to a single QuickBooks bank account, so if Shopify pays you out in more than one currency, you will want to reconcile those payouts using the manual method above for now.
4. Historical Catch-Up Sync
If you are months behind, you don’t have to rebuild those deposits by hand. Go to MyWorks Sync > Push > Payouts, and you’ll see a list of your past Shopify payouts. Select the ones you need and push them into QuickBooks in bulk — MyWorks creates the journal entries, and you reconcile from there.
Two things to know. MyWorks syncs new data automatically, so historical payouts won’t come across on their own until you push them. And if a payout has already synced, pushing it again will error rather than duplicate: delete the entry in QuickBooks first if you need to redo one.

A Shopify Clearing Account gives you a clear record of what has been sold, refunded, paid out, and still in transit. The payout journal entry then ties those movements to the actual cash arriving in your bank.
You can follow the manual process above when needed. But once payout volume makes that work repetitive, MyWorks for Shopify and QuickBooks Online can create the payout entries automatically from Shopify’s actual payout data.
Start a free trial or book a demo to see how it fits your workflow.
FAQs About Reconciling Shopify Payouts in QuickBooks Online
1. Why is my Shopify payout different from my sales in QuickBooks Online?
Your Shopify payout is smaller than your recorded sales because payment processing fees are deducted automatically, customer refunds are subtracted, and multiple days of sales are batched into a single deposit.
In our example, $2,760.00 in gross sales minus an $85.00 refund and $89.04 in merchant processing fees yields a net bank deposit of $2,585.96. Your sales entries record gross revenue on the exact day of checkout, while your payout records net cash days later after fees are taken out. Routing incoming sales through a dedicated Shopify Clearing Account bridges this timing and fee gap cleanly.
2. How do I record a Shopify refund in QuickBooks Online?
Record a Shopify refund by creating a Refund Receipt (+ Create > Refund receipt) dated the day the refund was issued, and set the “Refund from” drop-down menu to your Shopify Clearing Account.
Setting the refund account to your clearing account immediately reduces the holding balance and reverses the sales revenue in QuickBooks Online. When the payout batch lands later, it will only claim the net settled amount ($2,675.00). If a refund occurs on the 29th of the month but the payout lands on the 2nd of the following month, the clearing account safely holds that timing gap without distorting your monthly Profit & Loss statement.
3. How do I handle a negative Shopify Payout in QuickBooks Online?
When refunds outrun sales in a payout period, Shopify debits the net negative balance directly from your business checking account.
To record a negative payout in QuickBooks Online:
- Locate the debit transaction (money out) in your Bank Feed.
- Select Split on the transaction details panel.
- Categorize Line 1 to Shopify Clearing Account (to clear the negative gross return balance).
- Categorize Line 2 to Shopify Payment Processing Fees (for any applicable adjustment fees) until the split total matches the exact bank debit.
4. How do I catch up on months of unreconciled Shopify payouts?
Do not start with the backlog; set up your Shopify Clearing Account today and reconcile the current month cleanly first, then work backward month by month.
Trying to fix historical data while managing active daily sales leads to duplicate entries. Once your current month reconciles to $0.00, pull Shopify’s Payout Reconciliation Report for previous months to adjust historical balances systematically. If your backlog reaches a prior tax year that has already been filed, consult your accountant before making retroactive changes to closed periods.